A video walk through of this installation can be found here, starting from scratch. Note: some of the longer waits have been edited down in length. In that video, I set the memory to 4 Gb, which can be marginal for some things, If you have enough memory, you should set it to at least 6 Gb or preferably 8 Gb. A walk through for doing this can be found here.
VirtualBox is a free alternative to Parallels or VMWare that seems to have most of the same functionality, but takes a little more user intervention to get set up and make run properly. It runs on MacOS, Windows, and Linux, and in principle, most of what’s below is independent of the host OS, but these specific notes were used to install it on a two Macs (2011 iMac, OSX 10.13.6 and 2020 iMac, OSX 10.15.7):
- You can find the basic step-by-step instructions for downloading and installing VirtualBox and Windows here. Note that I used a “dynamically allocated” disk rather than “fixed size” to not waste disk space unnecessarily.
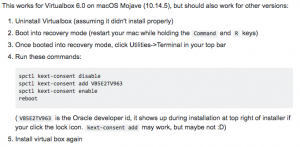
- Note: On a Mac, the installation will frequently fail because of kernel extension permission problems. Here are a bunch of possible solutions, none of which worked for me on my High Sierra Machine. I had to resort to the procedure below, which involved rebooting in Recovery Mode and running some command lines. Then it worked (update: installation worked fine on Catalina)
- For most users, you’ll want to go into the VM, do a <right-click>->”Display” and selecting the highest resolution.
- In my case, all the internet stuff worked immediately and automatically, and I quickly downloaded and installed Firefox.
- The first thing you’ll want to do is install the “Guest Additions”, as described in detail here. This will allow interaction between the host and the VM client.
- Among other things, you’ll be able to properly go to full screen mode.
- Go to “Settings->General->Advanced” and enable “bi-directional” for both the clipboard and drag and drop.
- You can now mount your local disks in VirtualBox by Doing:
- “Devices->Shared Folders->Shared Folder Settings…”
- “<Right-click> Machine Folders->Add shared folder…”
- Select “Folder Path->Other..” and navigate to the folder you want
- Give it a drive letter under “Mount Point”
- Select “Auto-mount” and “Make Permanent”
- The folder will now appear with the selected drive letter under File Explorer
- (Important!) If you want to use any USB hardware, you will need to install the “VirtualBox Extension Pack”, as described here, and then enabling USB 2.0 or 3.0.
- You can assign individual USB devices to the Windows client, by going to “Devices->USB” and selecting them.
- To permanently assign the device to the VM client, go to “Devices->USB->USB Settings…->Filters”, click the green icon to the right and select the device from the list (must be connected at the time). One you do this, it will automatically connect to the VM when you plug it in.
- Issues and quirks
- If you go into full screen mode, it doesn’t understand <cntl><left> or <cntl><right> to switch back to the MacOS desktop, unless you precede it with the <command> button (before, not concurrently!) to give control back to the host.
Recent Comments